Restringing Jewelry: Proven Techniques to Restore Your Favorite Pieces.
Have you ever reached for your cherished necklace or bracelet only to find it hanging awkwardly, with a clasp that just won’t stay? That sinking feeling when a beloved piece begins to lose its sparkle because the string or wire inside is frayed or stretched is all too common. I remember the first time I faced this dilemma—my grandmother’s wedding band was slipping off my finger, and I knew it was time to learn how to restring it myself. The good news? With a bit of patience and the right techniques, you can breathe new life into your jewelry and avoid costly trips to the jeweler.
Why Restringing Jewelry Should Be Part of Your DIY Toolkit
Jewelry is more than just accessories; they are sentimental treasures that tell stories. When the string, thread, or wire holding your favorite piece weakens, it’s like losing a piece of your history. Restringing isn’t just about fixing a knot; it’s about preserving memories, maintaining value, and gaining a satisfying sense of accomplishment. Plus, mastering the art of restringing can save you money and extend the life of your jewelry far beyond what you might expect.
Many people shy away from restringing because they fear it’s complicated or risky. I used to think that too—until I made the mistake of trying to fix a delicate pearl necklace with a basic knotting technique. The result was a tangled mess that made me realize I needed proper tools and a solid understanding of the process. That mistake led me down a path of learning proven techniques that anyone can follow.
In this post, I’ll walk you through everything you need to know about restringing jewelry—from choosing the right materials to mastering techniques that ensure your pieces are secure and beautiful. Whether you’re repairing a broken chain or refreshing a vintage strand, I’ll help you gain the confidence to do it yourself. And if you’re wondering whether restringing is really worth the effort, I’ll tell you—absolutely. It’s a skill that pays off in the form of jewelry that lasts and memories that are preserved.
Have you faced a frustrating jewelry mishap that made you wish you could fix it yourself? Don’t worry, you’re not alone. Let’s dive into the techniques that will turn you into your own jewelry repair expert.
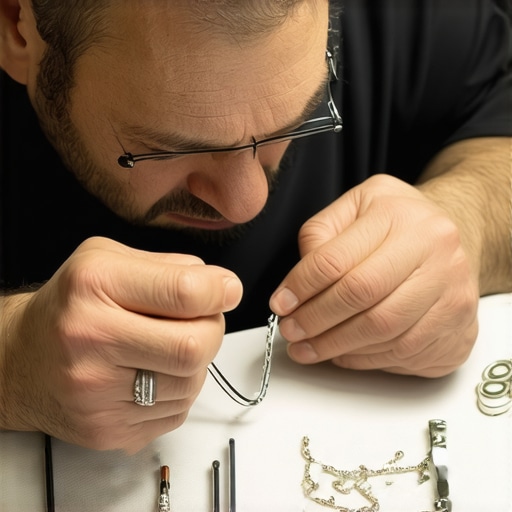
Choose the Right Materials and Tools
Start by selecting high-quality stringing materials such as silk thread, beading wire, or nylon cord, depending on your jewelry type. For delicate pearls or vintage beads, silk thread offers flexibility and a soft finish, while beading wire provides strength for heavier pendants. I remember my first attempt with nylon thread, which frayed quickly—so I switched to a more durable option after that lesson. Equip yourself with sharp scissors, jewelry pliers, and a bead reamer to make precise adjustments. For securing clasps and finishing knots, a crimping tool is essential. Proper tools make a significant difference in the final result.
Prepare Your Jewelry and Workspace
Lay out all beads, clasps, and findings before starting. Remove any old or damaged string, and clean the beads to ensure a smooth finish. Use a soft cloth to wipe dirt or oils that could weaken the new string over time. Find a well-lit, clutter-free workspace where you can work comfortably without rushing. I once tried restringing on a busy kitchen table, which led to lost beads and frustration—since then, I’ve dedicated a specific spot for jewelry repairs.
Restring with Precision and Care
Thread Your Beads and Prepare the End
Cut a length of stringing material about 1.5 times the length of your jewelry to allow for knots and adjustments. Thread your beads carefully, maintaining an even pattern. When you approach the end, double-check that the beads are snug but not too tight, to prevent stress on the string. For instance, I once pulled too tightly on a pearl necklace, causing some beads to crack—so I learned to leave a little slack for flexibility.
Secure the Clasp and Finish
Attach the clasp using crimp beads or knotting techniques. For secure knots, use a surgeon’s knot or a double knot, then apply a drop of jewelry glue for extra hold. When using crimp beads, thread the wire through the crimp, loop it back through the clasp, and squeeze the crimp tightly with pliers. Practice makes perfect—my first few attempts were messy, but with patience, I achieved neat, secure finishes. For detailed guidance, see this comprehensive restringing guide.
Check and Finalize Your Work
Double-check all knots and crimps for security. Gently tug on the beads to ensure they’re firmly in place. Trim excess string or wire, leaving a small tail, which you can hide inside the beads or secure with a dab of glue. Wear your piece to test comfort and durability. If anything feels loose or uneven, re-adjust immediately. This step saved me a few times from having to redo the entire restringing process.
Maintain Your Jewelry for Longevity
Store your jewelry properly—preferably in soft pouches or jewelry boxes—to prevent tangling or damage. Regularly inspect the strings and clasps for wear, and restring when necessary. I make it a habit to check my favorite necklaces every six months; early detection of fraying has saved many pieces from complete breakage.
By mastering these restringing techniques, you empower yourself to keep your jewelry beautiful and secure for years to come. For more advanced tips on stone setting or engraving that enhance your craftsmanship, visit this expert resource.
Many jewelry enthusiasts and even seasoned craftsmen fall into traps when it comes to advanced techniques like stone setting, restringing, appraisal, and engraving. Let’s dig deeper into some of the most pervasive myths and overlooked nuances that can sabotage your efforts or lead to costly mistakes. Understanding these subtleties can elevate your craftsmanship and ensure your jewelry remains both beautiful and durable.
Why do most people get stone setting wrong despite following tutorials?
It’s a common belief that mastering basic techniques guarantees perfect stone setting. However, the real challenge lies in understanding the specific properties of different stones and settings. For instance, bezel settings require a different approach compared to prong settings, especially when dealing with fragile or soft stones like opals. A frequent mistake is applying uniform pressure across all settings, which can cause stress fractures or loose stones. The secret is to tailor your technique based on the stone’s hardness, shape, and the metal’s flexibility. For advanced settings, like tension or channel settings, precision and understanding of the underlying physics are crucial. For a comprehensive look at stone setting techniques, I recommend studying expert tutorials that emphasize nuanced pressure application and material compatibility.
The trap of oversimplifying restringing and how to avoid it
Many believe that restringing merely involves threading beads onto a string and tying a knot. In reality, the choice of stringing material and knotting technique dramatically impacts durability. For example, silk thread is often underestimated in strength, leading to premature fraying if not properly reinforced with crimp beads or knots. Conversely, nylon or beading wire offers more resilience but demands careful tension management to prevent sagging or uneven wear. An often-overlooked nuance is the internal tension applied during restringing; too tight, and the string may snap or crack the beads; too loose, and the jewelry becomes floppy or insecure. I’ve seen many amateurs assume all knots are equally secure, but in practice, surgeon’s knots or double knots with glue provide far greater longevity. For more on this, check out resigning strategies.
Are appraisals simply about estimating value? Think again
Appraisals are often misunderstood as rough estimates of a jewelry piece’s worth. However, expert appraisals involve detailed analysis of materials, craftsmanship, provenance, and market trends. A common mistake is neglecting subtle factors like the quality of gemstone cuts or the metal’s purity, which can significantly influence value. Moreover, overconfidence in visual assessments without proper documentation or testing tools can lead to undervaluation or overvaluation. For instance, a gemstone’s origin or treatment status might dramatically alter its worth, and an appraiser’s expertise in these nuances is critical. To deepen your understanding, I recommend reading appraisal tips that highlight the importance of laboratory testing and market analysis.
Why engraving is more complex than it looks
Many think engraving is just about carving initials or patterns onto metal. But the reality involves balancing artistic vision with technical precision. A common misconception is that beginners can achieve professional results without understanding the properties of different engraving tools or the metal’s grain structure. Improper technique can cause cracks, uneven lines, or surface damage. For intricate designs, understanding the microstructure of the metal and the appropriate depth of engraving is essential. Also, the choice of tools—whether a burin, rotary tool, or laser—affects the final outcome. For advanced insights, explore engraving techniques that emphasize material compatibility and tool mastery. Remember, patience and practice are key to achieving high-quality engraved jewelry.
Have you ever fallen into this trap? Let me know in the comments. By understanding and respecting these nuances, you can avoid common pitfalls and elevate your jewelry craftsmanship to professional standards.
Maintaining the quality and longevity of your jewelry requires more than just a good eye and steady hands; it demands the right tools and ongoing care. When I started exploring advanced techniques like stone setting and engraving, I quickly realized that investing in high-quality, specialized equipment made all the difference. For instance, a precision diamond-tipped burr is indispensable for detailed engraving and micro-setting, allowing for cleaner cuts and finer lines. I personally prefer the Dremel 4000 rotary tool with a variety of attachments because of its versatility and control, especially when working on delicate surfaces.
The Hardest Lesson I Learned About Jewelry Repair
One of my most valuable lessons was realizing that patience and precision are more important than speed when restringing delicate beads. Rushing often led to mistakes like uneven tension or bead breakage, which set me back hours. Now, I take my time to ensure each knot is secure and the tension is just right, saving myself frustration and costly repairs later.
Why I Stopped Overlooking the Power of the Right Tools
Initially, I thought basic pliers and scissors were enough for engraving and setting stones. But as I tackled more complex projects, I discovered that specialized tools like micro-drills, high-quality crimping pliers, and precision engravers make a huge difference. Investing in the right equipment has elevated my craftsmanship and confidence significantly.
The Myth That All Jewelry Is Created Equal
I used to believe that any stringing material would suffice for all jewelry types. Now, I understand that choosing silk for vintage pearls or beading wire for heavier pendants is crucial. Matching the material to the piece’s needs ensures durability and a polished look, preventing repairs down the line.
Secrets That Only Experienced Jewelers Know About Engraving
One insight I wish I had earlier is that engraving isn’t just about carving; it’s about understanding the grain of the metal and selecting the right tool for the job. For intricate designs, laser engraving offers unparalleled precision, but mastering traditional hand tools can give you a level of artistry that machines can’t match. For detailed guidance, see this detailed engraving resource.
Curated Recommendations for Jewelry Repair Success
- Jewelry Pliers Set: A high-quality set with flat-nose, round-nose, and crimping pliers is essential. I trust the Beadsmith Jewelry Pliers Set because of its durability and precision.
- Silk Thread for Pearls: I recommend Miyuki Silk Thread for its strength and flexibility, perfect for vintage and delicate jewelry.
- Expert Guides: The book Jewelry Making and Repair Techniques by Susan C. Davis has been a game-changer for me, filled with step-by-step instructions and tips from pros.
- Online Tutorials: Check out this comprehensive guide to mastering stone setting and other advanced techniques.
Your Turn to Bring Jewelry to Life
Embarking on jewelry restringing and engraving can be incredibly rewarding, especially when you see your finished pieces shine with new life. Remember, every expert was once a beginner, and each mistake is a stepping stone toward mastery. So, gather your tools, learn from seasoned professionals, and don’t be afraid to experiment—your jewelry will thank you for it. What’s the first project you’re excited to tackle? Let me know below, and let’s grow together in this craft.
I recently started experimenting with restringing my vintage necklaces, and I completely agree that investing in the right tools makes a huge difference. I found that using a fine beading wire and crimp beads especially helps in creating a secure and professional-looking finish. One thing I’ve learned is the importance of testing the tension as you go; I used to pull too tight and risk cracking beads, but now I leave a little slack for flexibility. I’m curious, for those of you who have repaired or restringed jewelry with semi-precious stones, do you have specific tips for handling delicate or softer stones during the process? Sharing experiences or techniques would be really helpful to avoid unintended damage.
Reading through this post really resonated with my experience, especially with handling semi-precious stones like turquoise and opals. These softer stones require a gentle touch and sometimes special settings or protective measures during restringing. I’ve found that using a slightly wider bead hole and a softer silk thread can minimize stress and prevent cracking. Additionally, I double-knot the thread around the stone, ensuring extra security without applying excessive tension. When working with very delicate beads, I also switch to fine, beading-specific tools like softer-nosed pliers to reduce the risk of damage. Has anyone tried using silicone or other cushioning materials inside the bead holes to further protect fragile stones? I’d love to hear what methods others have found effective, especially for maintaining the integrity of softer gemstones while restringing.
Reading this post really resonated with me, especially the part about choosing the right materials and workspace. I remember my first attempt at restringing a vintage pearl necklace, and I didn’t pay enough attention to the tension I was applying. It resulted in a few cracked pearls, which was frustrating but a great learning experience. Since then, I’ve refined my technique and now always test the tension by gently tugging and leaving just enough slack for flexibility. I also agree that investing in good tools like quality pliers and crimping supplies makes such a difference in the finished look. Has anyone tried using silicone or soft padding inside bead holes to protect softer stones like opals during restringing? That might be a useful tip for those working with delicate gemstones. I’m curious, what’s everyone’s go-to material for restringing heavier or more fragile jewelry? Looking forward to hearing your experiences!