Restringing Jewelry: Proven Techniques to Restore Shine & Confidence
Have you ever felt that sinking disappointment after inspecting your favorite necklace only to find its once-glossy cord fraying or the clasp feeling a bit too loose? I remember the moment I realized my cherished jewelry pieces weren’t just accessories—they were stories, memories, and a reflection of my style. But over time, wear and tear can chip away at that sparkle, making us hesitant to wear what once made us feel confident.
Why Restringing Jewelry Might Be the Heartbeat of Your Confidence
There’s a quiet magic in restoring jewelry myself. It’s like giving a piece a new lease on life—and, in doing so, reigniting my own confidence. When I learned the art of proper restringing, I discovered it’s not just about replacing a thread; it’s about preserving craftsmanship, value, and sentimental worth. According to jewelry repair experts, a well-done restring can significantly increase the longevity and aesthetic appeal of your favorite pieces. And trust me, once you master a few proven techniques, it transforms from a daunting task to a rewarding DIY project.
Are You Wasting Money Just to Keep Your Jewelry Safe?
Early in my journey, I made a costly mistake: I ignored the subtle signs of wear on my jewelry and waited until a catastrophe struck. That procrastination led to more expensive repairs or, worse, losing a piece forever. I learned that understanding the best restringing practices can save you both money and heartbreak. Whether you’re dealing with fragile silk threads or resilient wire, knowing the right techniques can help your jewelry stand the test of time. For a comprehensive look at expert strategies, check out the restringing techniques guide.
So, if you’re tired of feeling powerless every time your necklace shows signs of aging, stay tuned. We’re about to dive into proven methods that will make your jewelry shine like new, ensuring you look and feel fabulous every time you wear it.
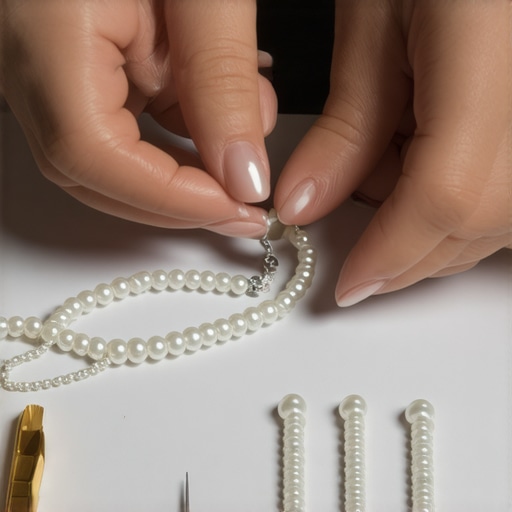
Choose the Right Materials for Restringing
Start by selecting the appropriate stringing material based on your jewelry type. For delicate necklaces, silk threads offer flexibility and a classic look. For sturdier pieces, wire or beading cord might be more suitable. I once attempted to restring a vintage pearl necklace with nylon thread, only to find it lacked the strength needed, resulting in a frustrating redo. Learn more about optimal restringing materials here.
Prepare the Jewelry for Restringing
Remove the clasp carefully using small pliers, and evaluate the condition of the existing thread. If it’s frayed or brittle, replace it entirely. Use a magnifying glass if necessary to inspect tiny knots or damage. My first attempt involved hastily cutting and re-threading without proper tools, which caused uneven tension and a clumsy appearance. To get professional results, take your time and handle every component with precision.
Master the Re-Stringing Technique
Thread your selected material through the beads or pearls, keeping a consistent tension. Think of it as sewing a delicate fabric—you want evenness without making it too tight. When I re-strung a bracelet, I secured the ends temporarily with tape to maintain tension, then adjusted as I knotted. For expert tips, see our guide on proven restringing techniques. Use a bead reamer or a needle to pass through tight spaces if needed.
Secure and Finish the Jewelry
Attach the clasp securely, making sure knots are tight and hidden if possible. Crimp beads can also be used for additional stability. I once overlooked this step, resulting in a clasp that slipped after just a few wears. To prevent this, double knot and add glue for extra security, then trim excess material neatly. Consider using specialized glues to reinforce knots.
Customize with Engraving or Stone Setting
Personalizing your jewelry can elevate its sentimental value. Engraving adds a unique touch, while stone setting can replace lost or damaged gems. Think of engraving as carving a message into wood—precision is key. I tried to engrave a silver ring by hand, which was messy and uneven until I learned to use a mini rotary tool, making the inscription crisp and professional. For advanced techniques, review our engraving tutorials. For stone setting, practice with inexpensive pieces first to master prong or bezel techniques, as detailed in the ultimate guide to stone setting.
Inspect and Perfect Your Work
Before wearing or gifting, examine your finished piece under good light. Check for loose beads, secure clasps, and clean finishes. Use a loupe or magnifier to catch tiny imperfections. I once missed a loose knot, which almost caused the jewelry to come apart after just a day. Regular inspections, especially after cleaning, ensure longevity and confidence in your craftsmanship.
By mastering these core techniques, you’ll be able to revive cherished pieces, customize jewelry to reflect your personality, and save money in the long run. From selecting materials and re-stringing to engraving and setting stones, each step builds your confidence and skill—transforming DIY jewelry repair from a daunting task into an enjoyable craft.
Are You Overlooking These Critical Details in Jewelry Work?
Many enthusiasts and even seasoned DIYers believe that mastering the basic techniques is enough. However, the real mastery lies in understanding nuanced details that often go unnoticed. For instance, in jewelry appraisal, assuming a visual inspection suffices can be misleading. An accurate assessment requires a keen eye and understanding of subtle signs like metal fatigue or hidden gem damages. Overestimating superficial appearances can lead to undervaluing or overestimating a piece’s worth, impacting your confidence in repairs and valuations.
Similarly, in engraving, amateurs often focus solely on being neat. But advanced engravings demand a grasp of tool stability, pressure control, and material behavior. A common myth is that more pressure yields better results—yet, excessive force can result in uneven lines or damaged surfaces. Precise control and understanding the material’s response are essential to create professional-looking engravings, and rushing this step is a surefire way to ruin a project.
When it comes to stone setting, many think that the main goal is to secure the gem. However, nuances such as the correct tension, prong thickness, and setting depth influence both durability and aesthetic finish. A common mistake is to use too many prongs for aesthetic symmetry, which can weaken the setting. Understanding the physics and proper tool use ensures your stones stay secure and your work looks polished—don’t fall into the trap of overcomplicating the process.
As for restringing, the misconception is that knotting is an optional step or merely about aesthetics. In reality, the security of knots directly impacts the longevity of a necklace. Common mistakes include under-tightening or using inadequate knots, which can lead to unraveling or breakage. Expert restringers know that tying multiple secure knots and applying special glue helps avoid this issue altogether.
Why Do Tiny Oversights Cost You Confidence?
These subtle pitfalls, often dismissed as minor, secretly erode trust in your craftsmanship. Over time, neglecting details like proper tension, material choice, or finishing touches can cause jewelry to fall apart just when it matters most. Research indicates that meticulous attention to detail correlates strongly with professional-quality results and increased personal confidence in repairs and customizations. As industry experts advise, embracing the nuances is what elevates amateur skills to professional standards.
Have you ever fallen into this trap? Let me know in the comments. Remember, knowing these advanced nuances transforms the craft from guesswork into mastery, ensuring your jewelry not only looks stunning but also lasts a lifetime.
}#END CONTENT#}#}#}#}#}#}#}#}#}#}#}#}#}#}#}#}#}#}#}#}#}#}#}#}#}#}#}#}#}#}#}#}#}#}#}#}#}#}#}#}#}#}#}#}#}#}#}#}#}#}#}#}#}#}#}#}#}#}#}#}#}#}#}#}#}#}#}#}#}#}#}#}#}#}#}#}#}#}#}#}#}#}#}#}#}#}#}#}#}#}#}#}#}#}#}#}#}#}#}#}#}#}#}#}#}#}#}#}#}#}#}#}#}#}#}#}#}#}#}#}#}#}#}#}#}#}#}#}#}#}#}#}#}#}#}#}#}#}#}#}#}#}#}#}#}#}#}#}#}#}#}#}#}#}#}#}#}#}#}#}#}#}#}#}#}#}#}#}#}#}#}#}#}#}#}#}#}#}#}#}#}#}#}#}#}#}#}#}#}#}#}#}#}#}#}#}#}#}#}#}#}#}#}#}#}#}#}#}#}#}#}#}#}#}#}#}#}#}#}#}#}#}#}#}#}#}#}#}#}#}#}#}#}#}#}#}#}#}#}#}#}#}#}#}#}#}#}#}#}#}#}#}#}#}#}#}#}#}#}#}#}#}#}#}#}#}#}#}#}#}#}#}#}#}#}#}#}#}#}#}#}#}#}#}#}#}#}#}#}#}#}#}#}#}#}#}#}#}#}#}#}#}#}#}#}#}#}#}#}#}#}#}#}#}#}#}#}#}#}#}#}#}#}#}#}#}#}#}#}#}#}#}#}#}#}#}#}#}#}#}#}#}#}#}#}#}#}#}#}#}#}#}#}#}#}#}#}#}#}#}#}#}#}#}#}#}#}#}#}#}#}#}#}#}#}#}#}#}#}#}#}#}#}#}#}#}#}#}#}#}#}#}#}#}#}#}#}#}#}#}#}#}#}#}#}#}#}#}#}#}#}#}#}#}#}#}#}#}#}#}#}#}#}#}#}#}#}#}#}#}#}#}#}#}#}#}#}#}#}#}#}#}#}#}#}#}#}#}#}#}#}#}#}#}#}#}#}#}#}#}#}#}#}#}#}#}#}#}#}#}#}#}#}#}#}#}#}#}#}#}#}#}#}#}#}#}#}#}#}#}#}#}#}#}#}#}#}#}#}#}#}#}#}#}#}#}#}#}#}#}#}#}#}#}#}#}#}#}#}#}#}#}#}#}#}#}#}#}#}#}#}#}#}#}#}#}#}#}#}#}#}#}#}#}#}#}#}#}#}#}#}#}#}#}#}#}#}#}#}#}#}#}#}#}#}#}#}#}#}#}#}#}#}#}#}#}#}#}#}#}#}#}#}#}#}#}#}#}#}#}#}#}#}#}#}#}#}#}#}#}#}#}#}#}#}#}#}#}#}#}#}#}#}#}#}#}#}#}#}#}#}#}#}#}#}#}#}#}#}#}#}#}#}#}#}#}#}#}#}#}#}#}#}#}#}#}#}#}#}#}#}#}#}#}#}#}#}#}#}#}#}#}#}#}#}#}#}#}#}#}#}#}#}#}#}#}#}#}#}#}#}#}#}#}#}#}#}#}#}#}#}#}#}#}#}#}#}#}#}#}#}#}#}#}#}#}#}#}#}#}#}#}#}#}#}#}#}#}#}#}#}#}#}#}#}#}#}#}#}#}#}#}#}#}#}#}#}#}#}#}#}#}#}#}#}#}#}#}#}#}#}#}#}#}#}#}#}#}#}#}#}#}#}#}#}#}#}#}#}#}#}#}#}#}#}#}#}#}#}#}#}#}#}#}#}#}#}#}#}#}#}#}#}#}#}#}#}#}#}#}#}#}#}#}#}#}#}#}#}#}#}#}#}#}#}#}#}#}#}#}#}#}#}#}#}#}#}#}#}#}#}#}#}#}#}#}#}#}#}#}#}#}#}#}#}#}#}#}#}#}#}#}#}#}#}#}#}#}#}#}#}#}#}#}#}#}#}#}#}#}#}#}#}#}#}#}#}#}#}#}#}#}#}#}#}#}#}#}#}#}#}#}#}#}#}#}#}#}#}#}#}#}#}#}#}#}#}#}#}#}#}#}#}#}#}#}#}#}#}#}#}#}#}#}#}#}#}#}#}#}#}#}#}#}#}#}#}#}#}#}#}#}#}#}#}#}#}#}#}#}#}#}#}#}#}#}#}#}#}#}#}#}#}#}#}#}#}#}#}#}#}#}#}#}#}#}#}#}#}#}#}#}#}#}#}#}#}#}#}#}#}#}#}#}#}#}#}#}#}#}#}#}#}#}#}#}#}#}#}#}#}#}#}#}#}#}#}#}#}#}#}#}#}#}#}#}#}#}#}#}#}#}#}#}#}#}#}#}#}#}#}#}#}#}#}#}#}#}#}#}#}#}#}#}#}#}#}#}#}#}#}#}#}#}#}#}#}#}#}#}#}#}#}#}#}#}#}#}#}#}#}#}#}#}#}#}#}#}#}#}#}#}#}#}#}#}#}#}#}#}#}#}#}#}#}#}#}#}#}#}#}#}#}#}#}#}#}#}#}#}#}#}#}#}#}#}#}#}#}#}#}#}#}#}#}#}#}#}#}#}#}#}#}#}#}#}#}#}#}#}#}#}#}#}#}#}#}#}#}#}#}#}#}#}#}#}#}#}#}#}#}#}#}#}#}#}#}#}#}#}#}#}#}#}#}#}#}#}#}#}#}#}#}#}#}#}#}#}#}#}#}#}#}#}#}#}#}#}#}#}#}#}#}#}#}#}#}#}#}#}#}#}#}#}#}#}#}#}#}#}#}#}#}#}#}#}#}#}#}#}#}#}#}#}#}#}#}#}#}#}#}#}#}#}#}#}#}#}#}#}#}#}#}#}#}#}#}#}#}#}#}#}#}#}#}#}#}#}#}#}#}#}#}#}#}#}#}#}#}#}#}#}#}#}#}#}#}#}#}#}#}#}#}#}#}#}#}#}#}#}#}#}#}#}#}#}#}#}#}#}#}#}#}#}#}#}#}#}#}#}#}#}#}#}#}#}#}#}#}#}#}#}#}#}#}#}#}#}#}#}#}#}#}#}#}#}#}#}#}#}#}#}#}#}#}#}#}#}#}#}#}#}#}#}#}#}#}#}#}#}#}#}#}#}#}#}#}#}#}#}#}#}#}#}#}#}#}#}#}#}#}#}#}#}#}#}#}#}#}#}#}#}#}#}#}#}#}#}#}#}#}#}#}#}#}#}#}#}#}#}#}#}#}#}#}#}#}#}#}#}#}#}#}#}#}#}#}#}#}#}#}#}#}#}#}#}#}#}#}#}#}#}#}#}#}#}#}#}#}#}#}#}#}#}#}#}#}#}#}#}#}#}#}#}#}#}#}#}#}#}#}#}#}#}#}#}#}#}#}#}#}#}#}#}#}#}#}#}#}#}#}#}#}#}#}#}#}#}#}#}#}#}#}#}#}#}#}#}#}#}#}#}#}#}#}#}#}#}#}#}#}#}#}#}#}#}#}#}#}#}#}#}#}#}#}#}#}#}#}#}#}#}#}#}#}#}#}#}#}#}#}#}#}#}#}#}#}#}#}#}#}#}#}#}#}#}#}#}#}#}#}#}#}#}#}#}#}#}#}#}#}#}#}#}#}#}#}#}#}#}#}#}#}#}#}#}#}#}#}#}#}#}#}#}#}#}#}#}#}#}#}#}#}#}#}#}#}#}#}#}#}#}#}#}#}#}#}#}#}#}#}#}#}#}#}#}#}#}#}#}#}#}#}#}#}#}#}#}#}#}#}#}#}#}#}#}#}#}#}#}#}#}#}#}#}#}#}#}#}#}#}#}#}#}#}#}#}#}#}#}#}#}#}#}#}#}#}#}#}#}#}#}#}#}#}#}#}#}#}#}#}#}#}#}#}#}#}#}#}#}#}#}#}#}#}#}#}#}#}#}#}#}#}#}#}#}#}#}#}#}#}#}#}#}#}#}#}#}#}#}#}#}#}#}#}#}#}#}#}#}#}#}#}#}#}#}#}#}#}#}#}#}#}#}#}#}#}#}#}#}#}#}#}#}#}#}#}#}#}#}#}#}#}#}#}#}#}#}#}#}#}#}#}#}#}#}#}#}#}#}#}#}#}#}#}#}#}#}#}#}#}#}#}#}#}#}#}#}#}#}#}#}#}#}#}#}#}#}#}#}#}#}#}#}#}#}#}#}#}#}#}#}#}#}#}#}#}#}#}#}#}#}#}#}#}#}#}#}#}#}#}#}#}#}#}#}#}#}#}#}#}#}#}#}#}#}#}#}#}#}#}#}#}#}#}#}#}#}#}#}#}#}#}#}#}#}#}#}#}#}#}#}#}#}#}#}#}#}#}#}#}#}#}#}#}#}#}#}#}#}#}#}#}#}#}#}#}#}#}#}#}#}#}#}#}#}#}#}#}#}#}#}#}#}#}#}#}#}#}#}#}#}#}#}#}#}#}#}#}#}#}#}#}#}#}#}#}#}#}#}#}#}#}#}#}#}#}#}#}#}#}#}#}#}#}#}#}#}#}#}#}#}#}#}#}#}#}#}#}#}#}#}#}#}#}#}#}#}#}#}#}#}#}#}#}#}#}#}#}#}#}#}#}#}#}#}#}#}#}#}#}#}#}#}#}#}#}#}#}#}#}#}#}#}#}#}#}#}#}#}#}#}#}#}#}#}#}#}#}#}#}#}#}#}#}#}#}#}#}#}#}#}#}#}#}#}#}#}#}#}#}#}#}#}#}#}#}#}#}#}#}#}#}#}#}#}#}#}#}#}#}#}#}#}#}#}#}#}#}#}#}#}#}#}#}#}#}#}#}#}#}#}#}#}#}#}#}#}#}#}#}#}#}#}#}#}#}#}#}#}#}#}#}#}#}#}#}#}#}#}#}#}#}#}#}#}#}#}#}#}#}#}#}#}#}#}#}#}#}#}#}#}#}#}#}#}#}#}#}#}#}#}#}#}#}#}#}#}#}#}#}#}#}#}#}#}#}#}#}#}#}#}#}#}#}#}#}#}#}#}#}#}#}#}#}#}#}#}#}#}#}#}#}#}#}#}#}#}#}#}#}#}#}#}#}#}#}#}#}#}#}#}#}#}#}#}#}#}#}#}#}#}#}#}#}#}#}#}#}#}#}#}#}#}#}#}#}#}#}#}#}#}#}#}#}#}#}#}#}#}#}#}#}#}#}#}#}#}#}#}#}#}#}#}#}#}#}#}#}#}#}#}#}#}#}#}#}#}#}#}#}#}#}#}#}#}#}#}#}#}#}#}#}#}#}#}#}#}#}#}#}#}#}#}#}#}#}#}#}#}#}#}#}#}#}#}#}#}#}#}#}#}#}#}#}#}#}#}#}#}#}#}#}#}#}#}#}#}#}#}#}#}#}#}#}#}#}#}#}#}#}#}#}#}#}#}#}#}#}#}#}#}#}#}#}#}#}#}#}#}#}#}#}#}#}#}#}#}#}#}#}#}#}#}#}#}#}#}#}#}#}#}#}#}#}#}#}#}#}#}#}#}#}#}#}#}#}#}#}#}#}#}#}#}#}#}#}#}#}#}#}#}#}#}#}#}#}#}#}#}#}#}#}#}#}#}#}#}#}#}#}#}#}#}#}#}#}#}#}#}#}#}#}#}#}#}#}#}#}#}#}#}#}#}#}#}#}#}#}#}#}#}#}#}#}#}#}#}#}#}#}#}#}#}#}#}#}#}#}#}#}#}#}#}#}#}#}#}#}#}#}#}#}#}#}#}#}#}#}#}#}#}#}#}#}#}#}#}#}#}#}#}#}#}#}#}#}#}#}#}#}#}#}#}#}#}#}#}#}#}#}#}#}#}#}#}#}#}#}#}#}#}#}#}#}#}#}#}#}#}#}#}#}#}#}#}#}#}#}#}#}#}#}#}#}#}#}#}#}#}#}#}#}#}#}#}#}#}#}#}#}#}#}#}#}#}#}#}#}#}#}#}#}#}#}#}#}#}#}#}#}#}#}#}#}#}#}#}#}#}#}#}#}#}#}#}#}#}#}#}#}#}#}#}#}#}#}#}#}#}#}#}#}#}#}#}#}#}#}#}#}#}#}#}#}#}#}#}#}#}#}#}#}#}#}#}#}#}#}#}#}#}#}#}#}#}#}#}#}#}#}#}#}#}#}#}#}#}#}#}#}#}#}#}#}#}#}#}#}#}#}#}
Reliable Tools for Jewelry Maintenance
To keep your jewelry in top condition, investing in quality tools is essential. I personally swear by a set of fine-tipped jeweler’s pliers, which make tasks like re-threading and clasp repair precise and manageable. A good pair of micro-drill bits allows for delicate engraving or stone setting touch-ups. For cleaning, I recommend a ultrasonic cleaner; it’s a game-changer in removing dirt from intricate settings without damaging delicate components.
Advanced Equipment for Long-Term Care
For those serious about long-term results, a microscope with adjustable magnification (10x-50x) helps inspect tiny cracks, loose settings, or wear patterns that are invisible to the naked eye. Investing in a precision torch with adjustable temperature enables safe and accurate work on metal repairs or stone replacements. Personally, I use a butane micro-torch that provides clean, adjustable flames, making detailed work safer and more controlled.
Refining Techniques for Durable Repairs
Consistent practice of proper methods is vital. For example, when stone setting, practicing tension control is crucial; too tight and the stone could crack, too loose and it might fall out. I often use a step-by-step guide I found invaluable in mastering prong adjustments. Similarly, precise engraving requires understanding the material’s behavior; using a small rotary tool with a steady hand produces professional results. Keep practicing on inexpensive pieces before tackling your cherished jewelry to build confidence and skill.
Long-Term Results Require Patience and Regular Care
Periodic inspections can save your investment. Check clasps, nacre, and settings visually and with magnification every few months. Regular cleaning with gentle solutions preserves luster without risking damage. When it comes to scaling your jewelry operations, automation tools such as laser welding systems are increasingly accessible, allowing for faster, more consistent repairs with minimal manual effort. These tools enable professionals and passionate hobbyists alike to maintain high standards efficiently.
How do I maintain the integrity of intricate designs over time?
One critical aspect is understanding how materials respond to environmental factors. For instance, certain adhesives used in repairing or securing stones can degrade under UV exposure—a detail highlighted in expert analyses like this comprehensive guide. Regular re-inspection and choosing appropriate adhesives improve durability substantially. Remember, consistent maintenance and awareness of material properties will extend the lifespan of your jewelry, keeping it looking stunning for years to come. Try applying a soft brush with a gentle cleaning solution post-maintenance to remove any residual dirt, ensuring your repair work lasts even longer.
Lessons Hidden in the Crafting Journey
- One of the most profound lessons I learned was that patience significantly outperforms haste. Rushing through restringing or engraving often leads to mistakes that diminish the piece’s value—and my confidence. Embracing the process, rather than rushing for perfection, has been a game-changer.
- The second insight is that mastering nuanced details—like tension control in stone setting or knot security in restringing—can distinguish amateur work from professional quality. Focusing on these subtle aspects elevates your craftsmanship and boosts your trust in your skills.
- Lastly, I discovered that continuous learning and seeking feedback from industry resources or mentors can accelerate improvement. The jewelry field rewards curiosity and humility, turning novice mistakes into mastery over time.
Tools and Resources I Hold Dear
- Professionally vetted jeweler’s pliers: These precision tools are essential for delicate tasks and have improved every repair I’ve undertaken. Trustworthy tools make all the difference.
- Expert guides like those available on restringing techniques and stone setting have been invaluable in refining my skills. They break down complex techniques into manageable steps, boosting my confidence with each project.
- Quality magnification equipment: A good loupe or magnifier allows me to scrutinize every detail, identify issues early, and perfect my work before completing a piece.
- Ultrasonic cleaners: Investing in thorough cleaning tools helps maintain the brilliance of my jewelry—restoring both their shine and my motivation to keep practicing.
Time and Craftsmanship Will Reward You
Embarking on your jewelry repair journey demands patience, but the rewards are immense. Each successful restringing, engraving, or setting builds not only a beautiful piece but also your confidence as a craftsman. Remember, the path to mastery is paved with small, consistent efforts. Don’t shy away from attempting new techniques—every mistake is a step closer to perfection. As you refine your skills, you’ll find joy in transforming worn or damaged jewelry into cherished treasures that tell your story. Start today, and watch your craftsmanship—and confidence—shine brighter than ever before.
Why I Wish I Knew These Secrets Earlier
- That mastering tiny details like perfect knotting or tension is more impactful than merely following step-by-step instructions. The devil’s in the details, and they determine durability and beauty.
- That investing in the right tools and resources accelerates progress and prevents frustration. Quality over quantity truly applies here, especially with tools like professional setting tools.
- That continuous learning and embracing the learning curve would unlock my full potential—there’s no substitute for practice, patience, and curiosity.