Stone Setting & Restringing Secrets for Stunning Jewelry Results Today
Ever had that sinking feeling when a cherished piece of jewelry suddenly loses its sparkle because a stone wobbles loose or a string snaps when you least expect it? I’ve been there. It’s frustrating, disheartening, and honestly, it can shake your confidence in your jewelry’s value. I remember the moment I realized that a simple mistake I made early on was costing me not just money, but trust in my own craftsmanship. That lightbulb moment led me down a path to uncover the real secrets behind stunning results in stone setting and restringing, and I want to share that with you today.
Why Getting Jewelry Repair Right Matters More Than Ever
In a world where jewelry is more than just adornment—it’s a symbol of love, achievement, and personal style—getting it right isn’t just about aesthetics. It’s about trust. Whether you’re a hobbyist or a professional, mastering the art of stone setting and restringing can significantly boost your confidence and your reputation. When done correctly, it transforms a piece from mediocre to magnificent. But here’s the catch: even small mistakes can lead to big setbacks. That’s why understanding the nuances of these techniques is essential, not only to improve results but to ensure your jewelry remains secure and beautiful for years to come.
Many folks overlook the importance of proper appraisal and trust-building strategies when repairing or customizing jewelry. Did you know that a well-executed stone setting can elevate a piece’s value and trustworthiness? According to experts, the secret lies in precise craftsmanship and attention to detail. For example, a sloppy prong setting can cause stones to fall out prematurely, which damages trust and costs money. That’s why I always recommend learning from reputable sources and honing your skills with dedicated techniques. If you’re serious about elevating your jewelry game, exploring comprehensive guides and expert advice can make a world of difference. For more insights, check out Mastering Stone Setting and Engraving Techniques.
Is the Hype Around Restringing and Setting Actually Worth It?
Initially, I thought that any repair or restringing was just a quick fix, not realizing how much craftsmanship and precision it demands. Early on, I made the mistake of rushing through a restringing job, which resulted in a knot that was too tight and damaged the delicate string. That taught me a vital lesson: quality work begins with patience and proper technique. The truth is, investing time into learning the best restringing methods and stone setting techniques pays off in the long run. Not only do your pieces look stunning, but their durability and trustworthiness are also greatly enhanced. If you’ve ever wondered whether these skills are really worth the effort, I can assure you—they absolutely are.
In our next sections, I’ll guide you through proven strategies and expert tips to elevate your jewelry repairs, ensuring each piece you work on exudes confidence and lasting beauty. Ready to transform your approach and see real results? Let’s dive into the secrets that can make all the difference.
,
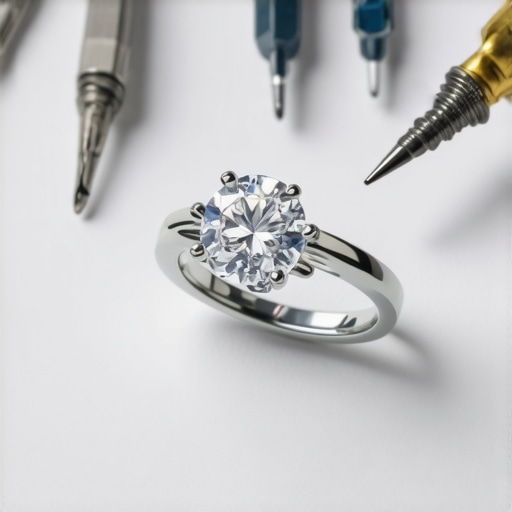
Gather the Right Tools and Materials
Start by assembling high-quality tools such as precision pliers, a jeweler’s loupe, a sturdy work surface, and appropriate strings or wires. I vividly remember the first time I tried restringing a delicate pearl necklace with subpar wire; the result was a frayed, insecure strand. Using the proper materials ensures durability and a professional finish. For expert advice on selecting the best supplies, visit best restringing and appraisal tips.
Preparing the Jewelry Piece
Cleaning and Inspection
Before any repair, thoroughly clean the jewelry with a gentle solution to remove dirt and oils. Inspect each component carefully under magnification to identify weak prongs, loose stones, or frayed strings. I once overlooked a tiny crack in a prong, which caused the stone to wobble. Recognizing such issues early prevents further damage and ensures a secure setting. To improve your appraisal skills, explore expert stone setting and appraisal tips.
Executing the Setting or Restringing
Restringing with Precision
Thread the string or wire through the beads or links, keeping tension even to prevent slack or tight spots. I once had a frustrating experience restringing a vintage bracelet, where uneven tension caused the string to snag. Patience here is key—use a bead reamer or nylon-coated wire for smooth results. Remember, a well-executed restringing enhances both the appearance and trustworthiness of the piece. For detailed restringing techniques, check top restringing tips.
Setting Stones Securely
When setting stones, start by securing the prongs with gentle, even pressure. Use a prong pusher to bend each prong inward gradually, avoiding over-tightening, which can crack the stone. I once hurried this process and cracked a sapphire—lesson learned. Practice makes perfect; take your time to ensure each prong holds firmly without risking damage. For expert techniques, refer to expert stone setting techniques.
Final Checks and Polishing
After completing the repair, inspect the piece under magnification for any loose stones or uneven prongs. Clean and polish to bring back its shine. I remember a time I skipped this step and missed a tiny gap that could have led to a stone falling out. Finishing touches make a significant difference in the final appearance and trustworthiness of your jewelry. For polishing tips, visit proven polishing strategies.
Practice and Patience Pay Off
Mastering these steps requires consistent practice and patience. Each piece you repair will build your confidence and skill. I remember the first time I successfully set a small diamond—what a proud moment! Keep learning, refine your technique, and always aim for quality over speed. For comprehensive guidance, explore mastering stone setting and appraisal.
Many DIY enthusiasts and even seasoned hobbyists believe that the key to successful jewelry repair is simply having the right tools and following basic instructions. However, this oversimplification often leads to overlooked nuances that can make or break your results. Let’s dig deeper into what most people get wrong about stone setting and restringing, and how avoiding these pitfalls can elevate your craftsmanship to professional levels.
Why the Myth of Speed Sabotages Quality
One of the most widespread misconceptions is that rushing through repairs saves time and effort. In reality, haste invites mistakes—like uneven tension during restringing or misaligned prongs in stone setting—that compromise both aesthetics and durability. I’ve seen countless cases where a hurried job resulted in loose stones or frayed strings that failed prematurely. Taking your time isn’t just about patience; it’s about precision. Remember, a well-executed repair doesn’t just look good; it builds trust and confidence in your work. For detailed techniques on slowing down and perfecting each step, explore top restringing tips.
The Hidden Trap of Over-Tightening
Another common mistake is over-tightening prongs or strings during the repair process. While it might seem intuitive to secure everything tightly, excessive pressure can weaken delicate materials or crack stones. For instance, I once over-bent a prong, which not only risked damaging the gemstone but also created an uneven setting that looked unprofessional. The secret lies in gentle, incremental adjustments—using the right tools and knowing when to stop. Expert advice emphasizes that proper tension is more about balance than brute force. To master this nuance, check out expert stone setting techniques.
How Do You Know When Your Repair Is Truly Secure?
Many repairers only do a quick visual check and assume their work is done. But true mastery involves thorough testing—twisting, gently tugging, and inspecting under magnification to ensure every stone is firmly set and every string is even. An often overlooked danger is incomplete tightening, which can cause stones to wobble or strings to fray over time. Recognizing these subtle issues requires an experienced eye and patience. Remember, the goal isn’t just a shiny finish but long-term trustworthiness. For advanced inspection techniques, visit ultimate jewelry appraisal guide.
Have you ever fallen into this trap? Let me know in the comments. Mastering these nuances takes practice, but once you understand the finer points, your jewelry repairs will always stand out—beautiful, durable, and trustworthy.
Keeping your jewelry repair tools in top shape is crucial for achieving professional results that last. Over time, even the best tools can degrade or become less precise, affecting the quality of your work. That’s why regular maintenance and investing in the right equipment are non-negotiable. I personally recommend investing in a high-quality jeweler’s loupe with at least 10x magnification, such as those from BelOMO. These allow you to inspect settings and stones with incredible clarity, catching issues before they escalate. Additionally, precision pliers like the Kumihimo or Swiss-made varieties help with delicate adjustments without damaging the metal or stones. Proper storage is equally important—keeping tools in a dedicated, organized case prevents corrosion and loss of calibration.
Alongside physical tools, software can streamline your workflow. For digital records, I rely on JewelCAD for designing and planning repairs. Its intuitive interface helps visualize complex settings and ensures accuracy before physical work begins. As technology advances, I believe we’ll see more AI-powered diagnostics that can suggest optimal repair techniques, further boosting trust and efficiency in jewelry craftsmanship.
How do I maintain my tools over time?
Regular cleaning is key. Use a soft brush and appropriate solvents to remove dirt and tarnish after each session. For precision tools, I recommend proper maintenance routines like oiling pivot points and checking calibration. Also, periodically sharpen or replace worn-out tools to prevent damaging delicate settings. For example, dull pliers can slip and mar the metal surface, undermining your craftsmanship and trustworthiness.
Keep your workspace organized and well-lit. Good lighting reduces eye strain and helps you see minute details, avoiding costly mistakes. I suggest investing in a LED magnifying lamp with adjustable brightness and a built-in magnifier. This setup significantly enhances precision, especially when working on tiny prongs or delicate wires.
Looking ahead, I see a future where smart tools with embedded sensors could provide real-time feedback on tension, alignment, and even material stress. This would make repairs more consistent and trustworthy, especially for complex or high-value pieces. For now, focus on maintaining your current tools diligently, practicing meticulous techniques, and gradually expanding your toolkit with specialized instruments like top-quality prong pushers and tension gauges.
If you want to elevate your repair game, start by trying out a precision patina brush for polishing or a micro torch for heat adjustments. These small upgrades can make a big difference in the long-term durability and trustworthiness of your work. Remember, consistent maintenance and the right tools are the backbone of reliable, professional jewelry repairs.
The Hardest Lesson I Learned About Jewelry Repairs
One of the most valuable lessons I learned was to never underestimate the importance of patience and precision when setting stones or restringing jewelry. Rushing a repair might seem like saving time, but it often leads to loose stones or frayed strings, which can damage trust and cost more in the long run. Taking the time to do each step carefully, from cleaning to final inspection, transforms a simple fix into a masterpiece of craftsmanship.
My Essential Toolkit for Jewelry Repairs
Investing in high-quality tools like a jeweler’s loupe, precision pliers, and a micro torch has made a world of difference. These tools allow me to inspect every prong and wire with clarity and make delicate adjustments without risking damage. Trustworthy brands such as BelOMO for magnifiers and Swiss-made pliers are my go-to choices because they deliver consistent, professional results.
Don’t Be Afraid to Start
Repairing jewelry, especially stone setting and restringing, might seem daunting at first, but with practice, it becomes a rewarding skill. Remember, every expert was once a beginner. Focus on mastering the fundamentals, maintain your tools diligently, and never hesitate to seek out expert advice or tutorials. The more you practice, the more confident and trustworthy your jewelry repairs will become. Ready to elevate your craft? Your journey to stunning, durable jewelry starts now.
This post really hits home about the importance of patience and precision in jewelry repair. I’ve learned through my own experience that rushing through a stone setting or restringing can lead to costly mistakes and undermine trust. I remember when I first started, I overlooked the importance of inspecting each component under magnification beforehand, which later caused a loose stone that needed redoing. Since then, I’ve adopted a more meticulous approach, taking my time through each step. One thing I find helps tremendously is investing in good quality tools like a reliable jeweler’s loupe and fine-tipped pliers—they make a world of difference in the quality of my work. I’d love to hear how others have improved their techniques or tools over time. What’s been your biggest breakthrough in mastering jewelry repairs?
This post really resonated with me, especially the emphasis on patience and using the right tools. I’ve found that regularly inspecting each piece under a quality magnifier before starting any repair makes a huge difference in catching tiny issues early—like weak prongs or tiny chips that could lead to larger problems down the line. I remember rushing a repair early on and ending up needing to redo it because I missed a crack in a setting, which was frustrating. Over time, I’ve learned that taking a methodical, slow approach with good-quality tools, like a precision plier and a sturdy loupe, results in much more reliable outcomes. Have you guys noticed a specific tool that dramatically improved your work quality? I’d be interested to hear what others find most helpful in elevating their jewelry repairs. It’s all about those small details that make a big difference in craftsmanship.
This post really underscores the importance of patience and precision in jewelry repairs, which I believe are often the most overlooked aspects by hobbyists and even some professionals. I remember initially rushing through restringing or setting stones because I was eager to finish quickly, only to find loose stones or uneven tension later. Investing in quality tools, such as a good jeweler’s loupe and precision pliers, truly made a difference in my work, especially in identifying weak prongs or tiny cracks I missed earlier.
One trick that helped me was practicing on less valuable pieces first to perfect my technique before working on cherished heirlooms. It’s also crucial to keep the tools well-maintained; dull or damaged tools can cause unintended damage. How do others here ensure their tools stay in top condition, especially when working on high-end jewelry? Would love to hear tips on maintaining tool sharpness and precision over time!
I really appreciated this article for emphasizing the importance of patience and proper tools in jewelry repair. I’ve found that using a quality jeweler’s loupe not only helps me spot tiny issues early but also boosts my confidence in making precise adjustments. One thing I’ve learned from experience is that even small tools, like the right set of precision pliers, can dramatically improve the quality of my work and extend the lifespan of the jewelry. I also started keeping a dedicated workspace with organized tools and good lighting, which has helped me work more efficiently and carefully. My question is, how do others here balance practice and improving skills with maintaining their existing tools? Do you have any routines for sharpening or cleaning tools regularly that keep your workflow smooth? I believe honing these small but crucial aspects truly leads to consistent, professional results and builds trust with clients or loved ones who wear your repairs.