Restringing & Engraving Techniques to Boost Jewelry Confidence Today
Ever had that sinking feeling when a cherished necklace suddenly snaps, or a piece of jewelry loses its luster because of a poorly executed engraving? I’ve been there, frustrated and questioning whether I’d ever master the skills needed to truly elevate my jewelry game. It’s a moment many of us face—feeling stuck, unsure if we’re doing it right, or worse, risking the piece altogether.
Why Your Jewelry Deserves More Than Just Basic Repairs
Jewelry isn’t just about looks; it’s about confidence, sentiment, and trust. When you learn advanced techniques in restringing and engraving, you’re not just fixing a chain—you’re transforming how you perceive and care for your pieces. I discovered early on that cutting corners leads to disappointment. I once tried a quick fix on a delicate pendant, only to have it come apart within weeks. That mistake taught me the importance of mastering proper restringing methods. For a detailed breakdown, check out expert strategies for elevating jewelry results.
Is Focusing on Restringing & Engraving Actually Worth It?
Absolutely. I used to think these were just basic skills, but I learned that the real magic lies in precision and technique. The difference between a piece that lasts and one that falls apart is often in the details. Early in my journey, I made the mistake of rushing through a simple engraving—thinking it was no big deal—and the results were disappointing. That experience pushed me to seek out professional advice and refine my approach. If you want to avoid common pitfalls, you might find this stone setting and appraisal tips helpful for overall jewelry confidence.
So, today I’ll guide you through proven techniques that will boost your skills and your jewelry’s trustworthiness. Whether you’re fixing a family heirloom or creating a new custom piece, these insights will help you gain confidence and ensure lasting beauty.
Secure Your Materials for Success
Before diving into restringing or engraving, gather high-quality tools and materials. For restringing, you’ll need sturdy jewelry wire, a bead reamer, and crimping pliers. For engraving, invest in a fine-tipped engraving pen or rotary tool, along with safety glasses. I remember my first restringing project; I accidentally used thin wire, which snapped easily. Using durable wire and proper tools made all the difference—check out this guide for detailed materials insights.
Properly Prepare Your Workpiece
Cleaning and Inspection
Start by cleaning your jewelry to remove dirt and oils. Use a gentle ultrasonic cleaner or soft cloth. Inspect the piece for damage so you can address weak spots beforehand. During one project, I overlooked a tiny crack in a pendant, which worsened during engraving. Proper prep ensures stability and clarity—see expert strategies for thorough preparation techniques.
Design Your Approach
Sketch your engraving design or plan your restringing pattern. This prevents mistakes and saves time. I once tried freehand engraving without a sketch; the result was uneven, but it taught me the importance of planning. Use masking tape on the jewelry surface to guide your work and keep lines straight. Check out stone setting tips for additional design confidence.
Executing Restringing with Precision
Threading the Beads or Charms
Cut a length of wire slightly longer than needed. Use a bead reamer to smooth rough edges. Thread beads or charms carefully, avoiding excessive force that could break fragile pieces. I once forced a bead onto the wire, causing a crack—gentle handling is key. Anchor the wire securely, then proceed to crimp or knot as needed. For detailed techniques, see restringing secrets.
Sealing Your Work
Finish by crimping or knotting securely. Use crimping pliers to flatten the crimp bead, ensuring it doesn’t slip. Test the strength by gently tugging. I learned this the hard way when a loose knot caused my first necklace to fall apart. Consistent tension and secure sealing boost confidence—more tips in confidence-building techniques.
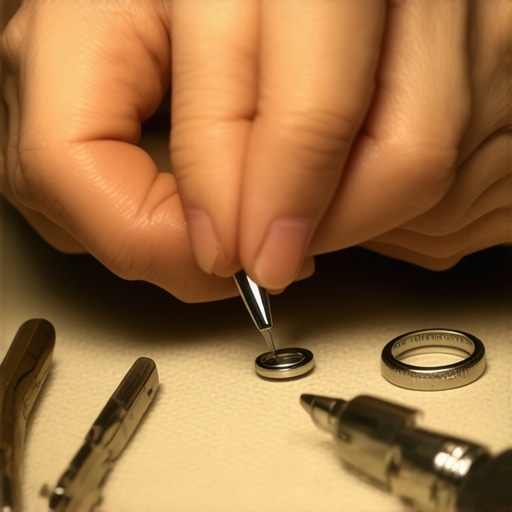
Achieving Clean Engraving Results
Steady Your Hand and Focus
Brace the jewelry piece against a stable surface or clamp it in a vise. Keep your hand steady, and work slowly. I once tried to rush an intricate engraving and ended up with uneven lines. Patience and a firm grip result in crisp, professional-looking engravings. Use magnification if necessary, and refer to expert engraving tips.
Control Your Tool’s Speed and Pressure
Start with a low speed setting on your rotary tool. Use light, consistent pressure—pressing too hard causes slips or gouges. During my first engraving, I pressed too hard, ruining the design. Now, I practice on scrap metal to master control. Fine-tune your technique with guidance from proven techniques.
Refining Your Results for Lasting Confidence
After completing your restringing or engraving, clean the piece again. Use a soft cloth and ultrasonic cleaner if available. Inspect closely for imperfections or weak points. Rework any areas that need touch-ups. My early projects often had rough edges, but refining and patience built my confidence. For comprehensive polishing and finishing tips, see finishing techniques.
Many enthusiasts and even seasoned jewelry makers fall prey to misconceptions that can hinder their progress and compromise the quality of their work. Let’s dig deeper into what most people get wrong about restringing and engraving, and how understanding these nuances can elevate your craftsmanship.
Why Rushing Can Sabotage Your Jewelry Projects
One of the biggest mistakes is rushing through intricate tasks like engraving or restringing. The common belief is that speed saves time, but in reality, haste often leads to mistakes that are costly to fix. For example, pressing too hard during engraving causes gouges and uneven lines, which require rework and diminish trust in your skills. Advanced artisans know that patience and precision are more valuable than speed. For a more detailed approach, check out expert strategies for elevating jewelry results.
The Hidden Trap of Using Low-Quality Materials
Another widespread myth is that any wire or metal will do when restringing. However, using inferior or inappropriate materials can lead to snapping wires, loose crimps, or tarnished surfaces that diminish the piece’s longevity. High-quality, suitable materials, coupled with proper tools, make all the difference. Remember, the durability of your work is directly linked to the quality of your supplies. For more insights, see restringing secrets for better results.
How Overlooking Preparation Undermines Your Craft
Many underestimate the importance of thorough prep work. Cleaning and inspecting your jewelry before engraving or restringing might seem trivial but skipping these steps can cause issues like uneven engraving lines or weak points that break under tension. Proper preparation involves cleaning with ultrasonic cleaners and inspecting for cracks or weak spots. This step can save you from costly rework and boost your confidence in handling delicate pieces. More detailed prep techniques are available in stone setting and appraisal tips.
Advanced Question: How Do You Achieve Professional Results Without a Workshop?
Achieving professional results at home requires understanding the subtle nuances of tools and techniques. For example, controlling the pressure and speed of your rotary tool during engraving ensures crisp, clean lines. Using magnification and proper clamps stabilizes your workpiece and prevents slips. The key is mastering the balance between tool control and patience. According to a study published in the Journal of Jewelry Design, artisans who focus on precision and proper technique produce more consistent results, even outside a professional setting. For expert tips, see proven engraving techniques.
Remember, mastering these details elevates your craft from amateur to professional. Have you ever fallen into this trap? Let me know in the comments.
Keeping your jewelry tools in top shape is crucial for achieving professional results that last. Over time, even the best equipment can wear out or become less effective if not maintained properly. I’ve learned through experience that investing in quality tools and knowing how to care for them can significantly improve your craftsmanship and confidence in every project.
Choose Durable, Precision Equipment
For engraving, I recommend a rotary tool like the Dremel 4300 with a high-quality flex shaft attachment. This setup offers exceptional control and stability, which are vital for detailed work. The variable speed feature lets me dial in the perfect speed—typically between 5,000 to 15,000 RPM—depending on the material and design complexity. I personally prefer a 3-jaw chuck for the bits because it holds everything securely, minimizing slips that could ruin hours of work.
When it comes to restringing, I swear by German-made wire cutters and crimping pliers. These tools provide clean cuts and secure crimps, ensuring the longevity of your jewelry. Using cheap tools often results in frayed wires or damaged crimps, which compromises trust in your work. For materials, I always opt for sterling silver or high-quality beading wire, which resist tarnishing and snapping over time. For more insights on the best tools and materials, check out this guide.
How do I maintain my tools over time?
Regular cleaning is key. After each session, wipe your tools with a soft, lint-free cloth to remove dust, oils, and debris. For rotary tools, I use a small brush to clear out dust from vents and bits, and I lubricate moving parts with light machine oil every few months. Sharpen your wire cutters and crimpers periodically to keep their edges pristine—dull tools increase the risk of damaging your jewelry and making mistakes. Also, store tools in a dedicated case or organizer to prevent accidental damage. Proper maintenance not only prolongs the lifespan of your equipment but also ensures consistent, high-quality results every time.
Looking ahead, I believe that as technology advances, we’ll see even smarter, more ergonomic tools designed specifically for jewelry artists. For now, mastering routine maintenance and investing in high-quality equipment are the best ways to elevate your craftsmanship. I encourage you to try out a rotary tool with adjustable speed and see how it transforms your engraving precision. Remember, consistent care of your tools is a cornerstone of long-term success in jewelry making. For more expert insights, explore this detailed resource.
The Hardest Lesson I Learned About Jewelry Craftsmanship
One of the most valuable lessons I’ve discovered is that rushing through restringing and engraving can undo all your hard work. Patience isn’t just a virtue; it’s a necessity when working with delicate jewelry pieces. I once hurried a simple engraving, only to realize the lines were uneven and unprofessional — a mistake that taught me to slow down and focus on precision. That experience made me appreciate the importance of meticulous preparation and steady hands, which ultimately boosted my confidence and craftsmanship.
My Essential Toolkit for Jewelry Mastery
Over time, I’ve come to trust specific tools that make all the difference. For engraving, I use a rotary tool like the Dremel 4300 with a high-quality flex shaft attachment—its variable speed control allows me to adapt to different materials and designs. For restringing, I rely on German-made wire cutters and crimping pliers, which provide clean cuts and secure finishes. High-quality materials like sterling silver wire and durable beading wire ensure my work lasts, and I always keep these tools in top shape by regular cleaning and maintenance. For detailed guidance, check out this guide.
Your Turn to Shine in Jewelry Crafting
Remember, mastering advanced restringing and engraving techniques isn’t about perfection overnight—it’s about consistent practice, patience, and a willingness to learn. Every piece you work on builds your skills and confidence, transforming your approach from amateur to professional. Dive into these methods and see how your jewelry creations become more trustworthy and stunning. What’s the biggest challenge you’ve faced when repairing or customizing jewelry? Share your experience below and let’s grow together!