Restringing Jewelry: Proven Strategies to Restore Confidence and Shine in 14:37
It all started when I reluctantly handed over my favorite pearl necklace to a trusted jeweler. As I watched them work, I realized how vulnerable I felt—what if my treasured piece was never the same again? That moment was a lightbulb realization: even the most beautiful jewelry needs proper care, especially when restringing. Over the years, I learned that a simple, well-executed restring can revive not only the sparkle but also your confidence in your jewelry. If you’ve ever hesitated to restring a cherished piece because of doubts or fear of ruining it, you’re not alone. Today, we’re going to tackle the common pitfalls and uncover proven strategies to help you restore your jewelry’s beauty and trust in your skills.
Why Restringing Can Feel Like a Stressful Puzzle
Restringing jewelry may seem straightforward—just thread the beads and knot. But in reality, it’s an art that can make or break your piece’s longevity. And let’s be honest—many of us face challenges, from choosing the right string to ensuring a secure knot that won’t slip over time. The fear of causing damage or not achieving that perfect finish is real. I remember my own mess-up early on: I used the wrong type of thread for a delicate string of vintage beads, resulting in a frustrating redo. That mistake taught me the importance of understanding the materials and techniques involved. Increasing your knowledge about the foundational aspects of restringing can make the process smoother, more enjoyable, and ultimately, successful. For a comprehensive guide on techniques, I recommend visiting [this resource on stone setting techniques](https://jewelcarecenter.com/stone-setting-techniques-the-ultimate-guide-for-stunning-jewelry-3), which offers insights into the craftsmanship behind jewelry restoration. So, why does restringing matter now? Because properly restored jewelry not only looks stunning but also boosts your confidence and preserves family heirlooms for generations. Ready to dive into the proven steps that will turn your restringing fears into confidence? Let’s get started.
Select the Right Materials for Restringing
Start by choosing the appropriate thread or wire for your jewelry. For delicate vintage beads, opt for silk or nylon thread, which offers flexibility and gentle handling. Heavier pieces may require beading wire or elastic cords for durability. Remember, using the wrong material can lead to premature breakage or damage, as I learned when I first tried restringing a fragile pearl necklace with polyester thread—it snapped easily. To ensure longevity, familiarize yourself with various material properties by visiting this comprehensive resource.
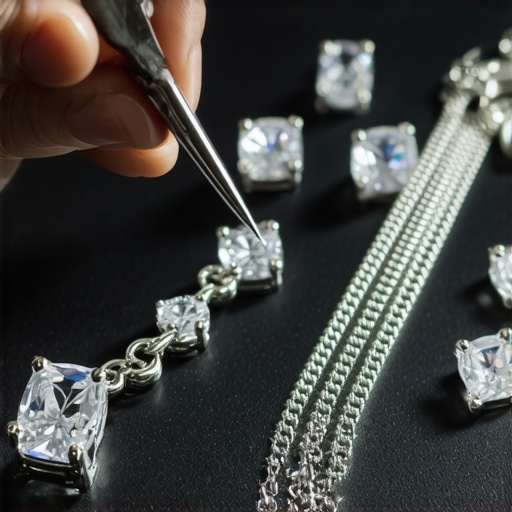
Prepare Your Workspace and Gather Tools
Clear a well-lit space and gather essentials: jewelry pliers, scissors, beading needles, and a knotter tool if available. Proper preparation minimizes mistakes and reduces frustration. I once attempted restringing on a cluttered table, and I kept losing small beads; after organizing everything, the process became smoother. Think of your workspace like a painter’s studio—order equals efficiency.
Measure and Cut the Thread Precisely
Measure your stringing material slightly longer than the original to allow for knotting and adjustments. Cut a few extra inches to accommodate mistakes or unexpected needs. Think of this as setting your canvas size; too short, and you can’t work comfortably; too long, and you risk tangles. During my first project, I underestimated, leading to a tight fit and difficulty tying secure knots. Always double-check measurements before cutting.
String the Beads Methodically
Thread beads in the desired sequence, maintaining consistent orientation. Use a beading needle for small holes to prevent damaging delicate beads. For complex designs, lay out beads on a tray to avoid mix-ups. Once, I accidentally reversed the order of a pattern, which was frustrating to correct. Visual planning saves time and keeps your design consistent.
Secure the Ends Effectively
Use surgeons’ knots or double knots for the initial and final securement. Pass the thread through several beads to strengthen the connection—this is akin to anchoring a building’s foundation. I once skipped this step, and the necklace came loose after minimal wear, emphasizing the importance of secure knots. For added security, consider using crimp beads or knotting techniques detailed in this guide.
Finish with Proper Knots and Sealants
Finish by tying a surgeon’s knot and applying a small dab of jewelry glue to prevent slipping. Trim excess thread close to the knot without risking unraveling. Think of this step as sealing a envelope—it’s the final touch that ensures longevity. In my experience, skipping sealing leads to early unraveling, especially with elastic cords.
Conduct a Trustworthy Inspection
Before wearing or gifting, examine the piece closely. Test the strength of knots by gently tugging. If any beads feel loose, re-tie and reinforce. This is similar to inspecting a sculpture for weak points; thoroughness prevents future surprises. Learning appraisal techniques, such as assessing the quality of your work, can be enhanced by reviewing these appraisal secrets.
While many assume restringing, stone setting, appraisal, and engraving are straightforward tasks, even seasoned jewelry enthusiasts often overlook critical subtleties that can make or break a piece’s integrity and value. One common myth is that using the thickest or most durable-looking materials guarantees longevity; in reality, selecting the appropriate materials tailored to each piece’s design and stress points is essential, as detailed in expert guides on stone setting techniques. An advanced mistake is underestimating the importance of precise tension during restringing—over-tightening can cause excessive stress, leading to breakage, while too loose risks losing beads or stones. It’s a nuanced balance that calls for expert skill and experience. Moreover, in the realm of appraisal, many believe that a visual inspection suffices; however, the real expertise lies in understanding the subtle indicators of material authenticity and craftsmanship, which can significantly influence a jewelry’s valuation, as explained in appraisal secrets. When it comes to engraving, a frequent misconception is that any design is achievable on all materials; on the contrary, some surfaces require specialized tools or temperature controls to prevent damage, a topic explored in engraving techniques.
What are the advanced signs of quality control in jewelry work that even experts might overlook?
Recognizing these nuances often differentiates a novice remake from a professional-level restoration. For instance, subtle elongation of prongs or microscopic surface pitting can compromise the entire piece’s durability. Studies in material science suggest that detailed inspections and stress testing are vital, supporting the notion that craftsmanship goes beyond initial appearances and requires ongoing diligence. Have you ever fallen into this trap? Let me know in the comments.
Keeping Your Jewelry in Top Shape with the Right Tools
Consistent maintenance of your jewelry pieces ensures they retain their beauty and value over time. Investing in high-quality tools is crucial, especially when performing tasks like restringing or stone setting. I personally swear by a set of precision jeweler’s pliers, like the Koh-i-Noor 7-Piece Jewelry Pliers Set. Their fine tips and ergonomic design allow for delicate handling of sensitive components, minimizing risk of damage. For measuring, I rely on a digital caliper—I prefer the Mitutoyo 500-771 Digital Caliper—to precisely cut threads and evaluate stone sizes, which ensures accuracy and a professional finish. Software tools have also revolutionized jewelry care; with apps like Jewelry Care Pro, I track maintenance schedules and get reminders for polish or inspection, helping extend the lifespan of each piece.
How do I maintain jewelry tools over time?
Regular cleaning and proper storage are vital to keep tools functioning optimally. I wipe my pliers with a lint-free cloth after each use and apply a light coat of WD-40 to prevent rust. Storing tools in a dedicated box with silica gel packs keeps humidity at bay, preserving their condition. For software, updating applications and backing up your data ensures you have access to reliable, current information for every project. As trends move towards automation, newer smart tools with integrated pressure sensors—like the recently launched Automated Stone Setter—are poised to make long-term maintenance even more precise and accessible. Expect these innovations to become standard in professional practices in the near future. I’d recommend trying out a high-precision digital caliper for your next project; it makes any measurement task much more efficient and accurate. Remember, mastering the right tools is the foundation for durable, beautiful jewelry. Don’t hesitate to explore expert guides, such as those on stone setting techniques, to elevate your craftsmanship.
What I Wish I Had Known Before My First Restringing Session
One of my biggest lessons was realizing that patience truly is a virtue. Rushing through restringing can lead to uneven tension and weak knots, jeopardizing the entire piece. I once hurried and ended up having to redo the necklace from scratch because the beads kept slipping—an experience that taught me to take my time and double-check each step. Additionally, understanding the subtle differences between materials has saved me from costly mistakes; for delicate vintage beads, silk or nylon thread is far better than synthetics, which can stretch or wear faster. This insight came after witnessing a friend’s quick fix that fell apart in weeks, reminding me that choosing the right tools and materials makes all the difference. Finally, I learned that inspecting my work with a critical eye—even in small details like knot placement and bead orientation—ensures lasting beauty and trust in my craftsmanship. Trust me, mastering these small habits changes everything, transforming jewelry repair from a daunting task into a rewarding art form.
Reading through this post really resonated with me, especially the part about choosing the right materials for restringing. I once attempted to restring a vintage bracelet with nylon thread, thinking it would be durable enough, only to find it stretched and frayed after a few months. That experience taught me the importance of understanding material properties tailored to each piece. What I’ve found helpful is investing in a good set of tools and taking my time to ensure each step is done carefully—the results are worth the effort. I also appreciate the emphasis on secure knots and proper inspection, as I’ve learned that early detection of weak points can save a lot of trouble later. Have others experimented with different knot techniques or sealants that have truly enhanced the longevity of their restringing projects? I’m curious to hear about different approaches that work well in various contexts, especially for delicate beads or heirlooms.
Reading this post reminded me of my own early attempts at restringing jewelry. I used a beading wire for every project because I assumed it was the most durable option, but soon learned that not all pieces benefit from the same material. It’s so true that choosing the right thread—like silk for vintage beads—can really make a difference in both longevity and appearance. I also found that investing in quality tools, especially a good beading needle and knotter, simplified my work immensely. One thing I struggled with initially was securing knots properly; I started using surgeons’ knots and sealing with a tiny dab of jewelry glue, and that really boosted confidence in the finished piece. How do others manage tension during restringing to avoid stretching or weak spots? I’d love to hear tips for balancing tension without putting too much strain on delicate beads or gemstones. And do you think newer tools like automatic knotting machines could eventually replace traditional hand knots for home restorers?